Warning: SOLIDWORKS System Resources Running Low
This blog is for those unlucky individuals working in SOLIDWORKS are persistently annoyed by this message.
You check the Task Manager, only to find that there are still plenty of RAM left; not even at 50% capacity. Most of the time, you are likely to ignore or dismiss this message and just continue working. However, if this message turns into “Available system memory is Critically Low” then we are at a risk of the application crashing.
In this article, couple of suggestions will be made which will help prevent these messages from appearing, and hopefully avoid the inevitable crashes due to insufficient system memory. The resource monitor does not pin point what’s causing the lack of memory/resource. It could be any of or combination of GDI Objects, RAM and VRAM shortage.

1. GDI Objects Limit
GDI Objects (Graphics Device Interface) is a core windows component responsible for representing graphical objects and outputting them to devices such as printers or monitors.
For every window or application that is open, it uses up GDI Objects. The problem arises when there are too many objects are in use and causes unresponsive program behavior. This is also what may trigger the lack of system resources. For Windows 8 and later, the system wide GDI Objects are limited to max out at 65,536; and the maximum single process is 16,384.
The default limit set by Windows for any single process is 10,000 GDI objects. If your application GDI Objects exceeds this amount, that process is likely to crash.
SOLIDWORKS should not require more than the default limit of 10,000. If you observe over 10,000 GDI objects after following the below steps to monitor GDI usage, contact your local Value Added Reseller (VAR) for assistance troubleshooting this and reporting to SOLIDWORKS Support.
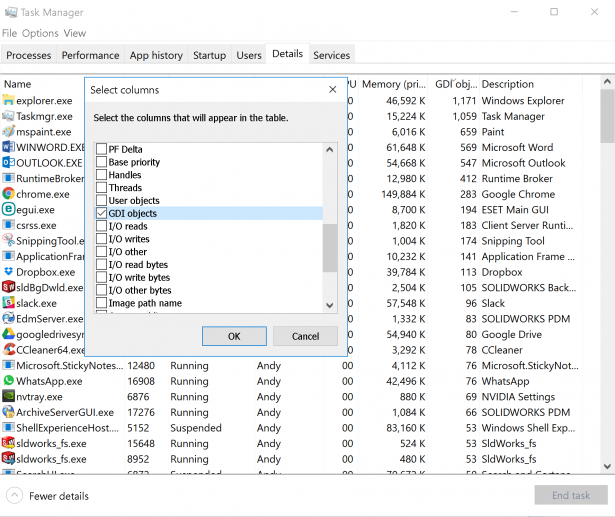
You can monitor this through the Task Manager.
- Open Task Manager (right click on start bar > Task Manager OR through CTRL+ALT+DEL)
- Click on ‘Details’ Tab
- Right click on one of the columns and click on ‘Select Columns’
- Tick the GDI objects

Suggested Solution:
This solution will involve editing the Windows Registry.
Disclaimer: Modifying the registry can cause serious problems that may require you to reinstall your operating system. We cannot guarantee that problems resulting from modifications to the registry can be solved. Use the information provided at your own risk.
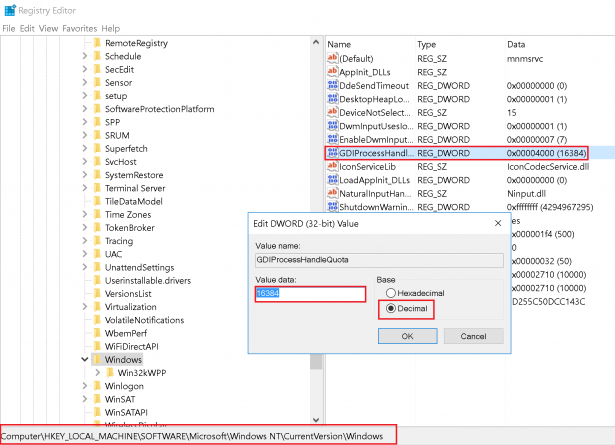
As mentioned before, the windows by default sets the GDI Objects limit for a single process to be 10,000. However the maximum allowed is 16,384. By increasing this limit in the registry, it will give any given application more room to breathe.
- Open Regedit (via Run > type ‘regedit’)
- Locate to the key: HKEY_LOCAL_MACHINE\SOFTWARE\Microsoft\Windows NT\CurrentVersion\Windows\GDIProcessHandleQuota
- Right click on the ‘GDIProcessHandleQuota’ and click ‘Edit’.
- Change the registry key to the maximum process limit 16,384; set the BASE to DECIMAL.

2. Virtual Memory
Another major cause for insufficient system memory could be due to virtual memory of Windows.
Virtual memory, also known as Page File is a memory combination of RAM and a portion of your hard drive disk. Whenever your system runs out of physical RAM, Windows will make use of the Page File to temporarily store files and swap back to the physical RAM when it is freed.
By default, your virtual memory (page file) managed by windows. Custom Size allows you to set the size of the page file. As a general guide, the maximum size of the paging file should be 2 times the amount of physical RAM installed on the machine.
How to set custom sized virtual memory:

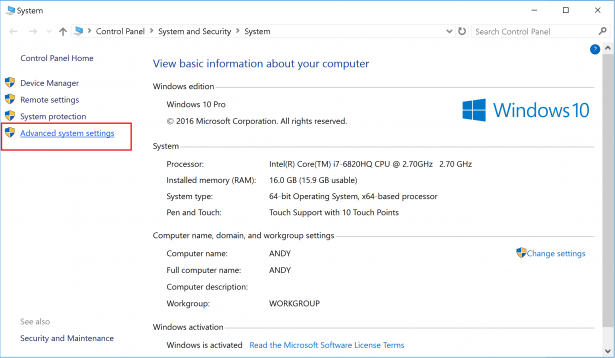
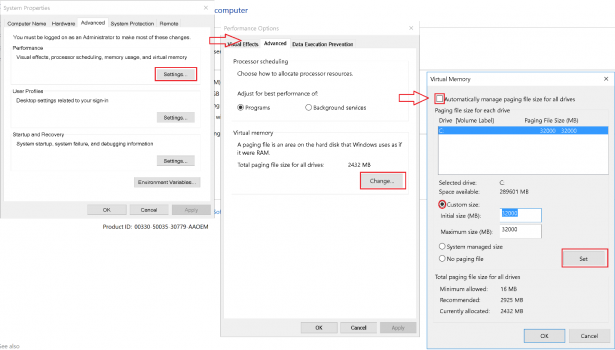
- System > Advanced System Settings > Advanced (Tab) > Settings..
- Advanced (Tab) > Change..
- Untick ‘automatically manage paging file size for all drives
- Choose the Drive you would like to utilize Virtual Memory on. (eg. My workstation only had C:\ which is the SSD)
- Choose Custom size button
- Enter the Initial size value of 2 times the amount of physical RAM installed in your system (eg. If you have 16GB, type in 32000MB.)
- Enter Maximum size value same as the initial size.
- Press ‘Set’
- Restart your workstation.


Kategorie: Administration, SOLIDWORKS, Support, Tips & Tricks, Usability


